If you want to shrink an allocated partition in Windows Server 2019, there are Windows native and third party tools. Native tools include Disk Management and diskpart. Disk Management works with graphical interface, follow the steps to shrink partition in Server 2019 with Disk Management. In this article I'll show you how to shrink partition with diskpart in Windows Server 2019/2022. Many server administrators like to use command line tool, but to shrink volume in Server 2019/2022, diskpart is not the best tool because of some shortages.
How to shrink partition with diskpart in Windows Server 2019/2022:
- Press Windows and R together on your keyboard, type diskpart and press Enter, then diskpart command prompt will be opened.
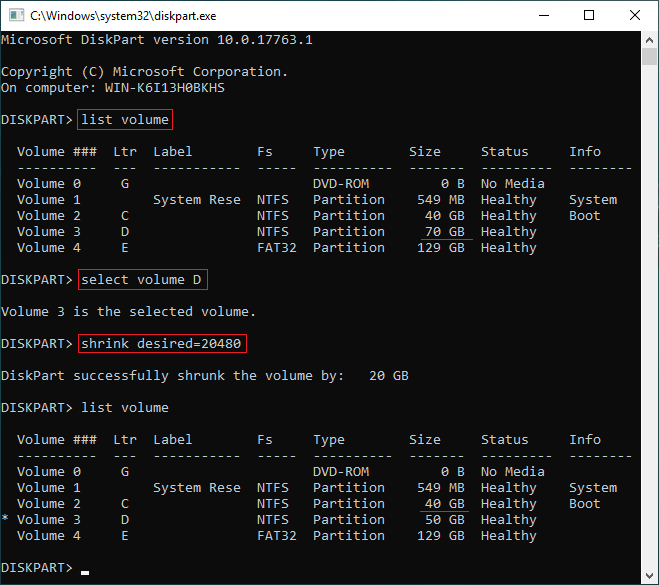
- Type list volume in the command window and press Enter.
- Type select volume D and press Enter. (D is the number or drive letter of the partition that you want to shrink.)
- Type shrink desired=XX. (XX is an amount without MB.)
Run list volume again, as you see, drive D is shrunk from 70GB to 50GB.
It is easy and fast to shrink volume with diskpart in Windows Server 2019, but diskpart is not the best tool because of some limitations.
Limitations of diskpart to shrink volume in Server 2019/2022
1. Only NTFS partition is supported
Diskpart shrink command can only shrink the partitions that are formatted with NTFS file system or without file system (RAW). If you shrink FAT32 or any type of partitions, you'll receive error "The volume cannot be shrunk because the file system does not support it."

2. Unallocated space can only be made on the right
Diskpart only lists all partitions in a list with little information, it doesn't display Unallocated space. When you shrinking volume with diskpart command, it only gives an option to specify an amount and then reports if this partition is successfully shrunk. After shrinking partition, Unallocated space is generated on the right side.
It doesn't matter if you just want to shrink a NTFS partition to get Unallocated space and then create new volume(s), but it is big issue if you want to extend other volume with this Unallocated space. No matter you run Disk Management or diskpart extend command, you can only extend Unallocated space to the left contiguous partition. In a word, these 2 native tools cannot extend a partition by shrinking another one.
3. Sometimes it can only shrink little space
If there are some unmovable files, when you shrinking system C drive with diskpart in Windows Server 2019, you may receive the error "The specified shrink size is too big". Diskpart cannot shrink a partition beyond the point where unmovable files are located.
Better way to shrink partition in Windows Server 2019/2022
There are no such limitations with server partition software, you just need to drag and drop on the disk map to shrink and extend partition. However, you'd better make a backup and run safe partitioning software, because there's potential system and data damage risk.
Better than other software, NIUBI Partition Editor is much safer and faster because of its advanced technologies:
- Virtual Mode - all operations will be listed as pending for preview, real disk partitions won't be modified until click Apply to confirm.
- Cancel-at-will - if you applied wrong operations, it doesn't matter, you can cancel the ongoing operations without losing data.
- 1 Second Rollback - if encounter any error while resizing partition, it automatically reverts server to original status in a flash.
- Advanced file-moving algorithm - move and extend partition 30% to 300% faster, saving much time especially when there are large amount of files in a partition.
Download NIUBI Partition Editor and follow the steps in the video to shrink and extend partition:
How to extend system partition by shrinking data volume(s):
How to extend D drive by shrinking other partition: