This article introduces how to shrink volume in Windows Server 2008 R2 Disk Management without losing data and the limitations of "Shrink Volume" function.
How to shrink volume in Server 2008
Better than previous version, Windows Server 2008 has "Shrink Volume" function built in Disk Management. It is able to shrink system partition and data volumes without losing data on the fly. Better than Diskpart command, Disk Management displays disk partition structure and other information with graphical interface. You'll see the result visually after shrinking a volume. If any partition cannot be shrunk, Shrink Volume option is disabled.
Steps to shrink volume in Windows Server 2008 R2 Disk Management:
Step 1: Press Windows and R together on the keyboard, type diskmgmt.msc and press Enter, then Disk Management will be opened.
Step 2: Right click the partition that you want to decrease and select Shrink Volume from the list.
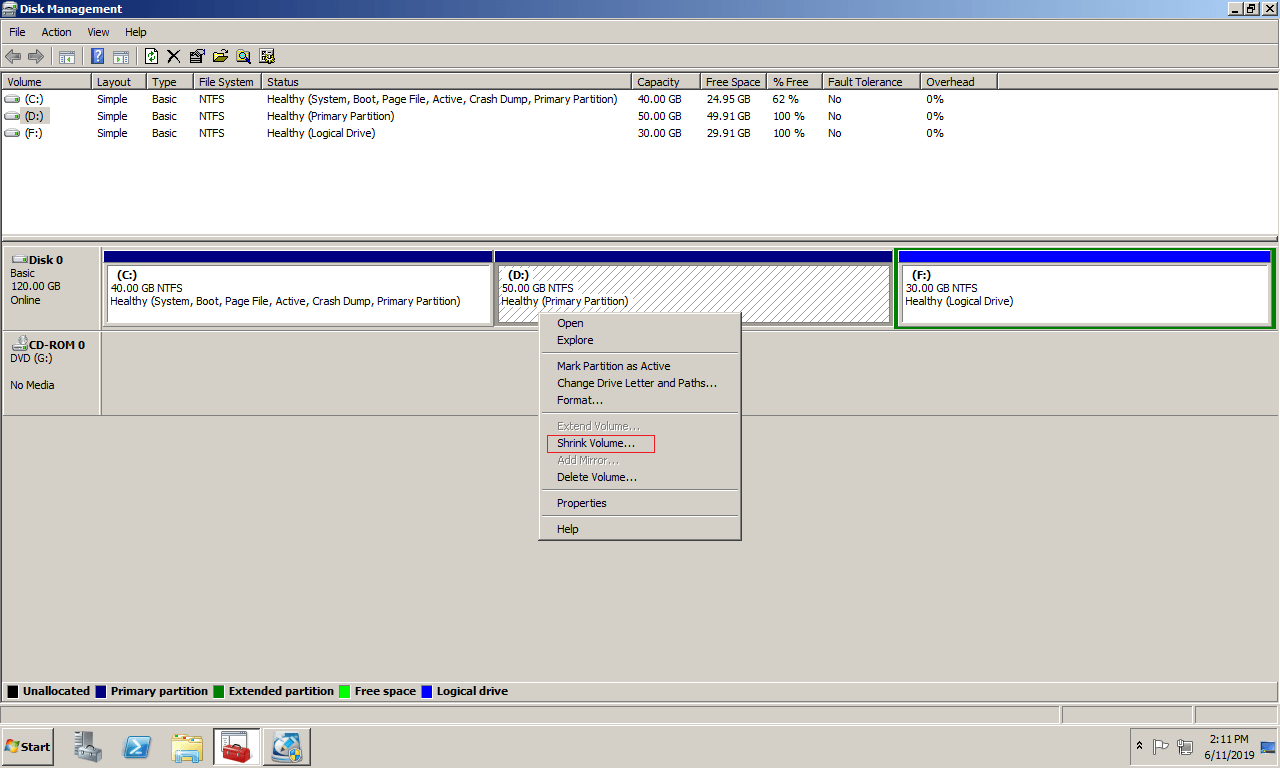
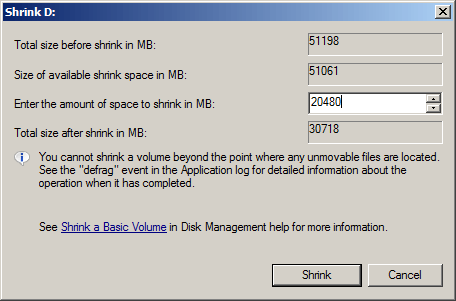
Step 3: Maximum available space is given by default, click Shrink button or enter an smaller amount first. Here I entered 20480.
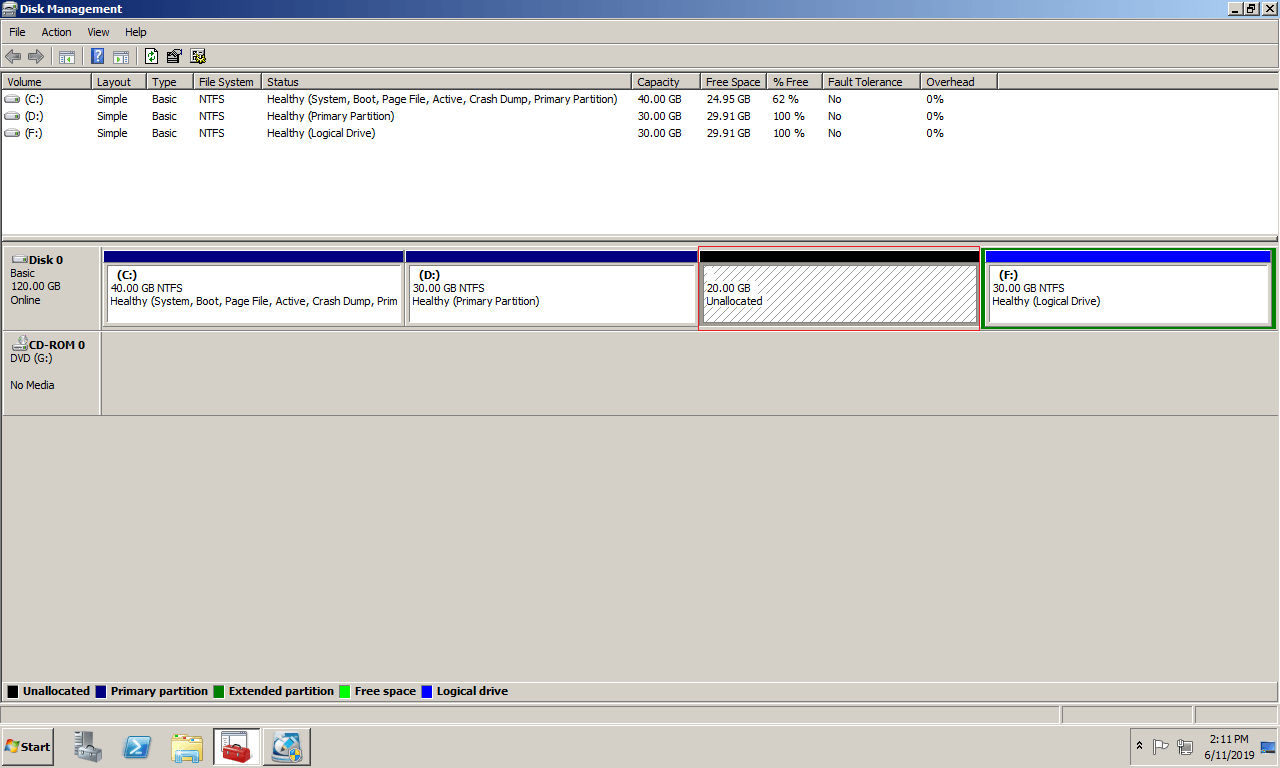
In a short while, partition D is shrunk from 50GB to 30GB and 20GB unallocated space is made on the right of D.
Although it is very easy to shrink partition with Server 2008 Disk Management, you may encounter trouble in some situations, because this native tool has some restrictions.
Limitations of Shrink Volume function
1. Only NTFS partition can be shrunk
Shrink Volume can only shrink the partitions that are formatted as NTFS or without any file system (RAW). When you right click FAT32 or any other types of partitions, Shrink Volume option is grayed out.
2. Cannot shrink beyond unmovable files
In the shrinking window, there is a tip - You cannot shrink a volume beyond the point where any unmovable files are located.
These unmovable files include Paging File, Hibernation and other large files. If there are such files, Disk Management gives little or even 0 in the shrinking window, although there is plenty of free space in this partition.
These unmovable files are unusually in system partition C, so you are very likely encounter this issue while shrinking C drive.
3. unallocated space can't be made on the left
While shrinking volume with Server 2008 Disk Management, there's only one option for you to enter an amount of space. After that, this partition will be shrunk towards left and unallocated space will be made on the right.
It is not an issue if you want to create new volume with this unallocated space, but if you want to extend other partitions with this space, it is impossible with Disk Management. Extend Volume function can only combine unallocated space to the left contiguous partition. Therefore, Extend Volume is grayed out for C: and E: drive after shrinking D.
Diskpart command has the same restrictions.
Better way to shrink disk partition
Comparing with native Diskpart and Disk Management tool, NIUBI Partition Editor is much more powerful, it is able to:
- Shrink and extend NTFS and FAT32 partitions.
- Shrink volume and make unallocated space on either left or righ.
- Shrink a volume to minimum size (if you want), because it can move these unmovable files.
- Combine unallocated space to either contiguous partition by 1 step.
- Move and merge unallocated space to any nonadjacent partition in the same disk.
- Merge, copy, convert, defrag, hide, wipe, scan partition and much more.
Download NIUBI Partition Editor Server and follow the steps in the video to shrink volume in Windows Server 2008 R2:
Right click any NTFS or FAT32 partition and select "Resize/Move Volume", drag either border towards the other side in the pop-up window, then you can shrink this volume or combine unallocated space to this volume. Drag the middle of this partition towards other side, then you can exchange the position of this partition and adjacent unallocated space.