The same with physical server and client computer, Hyper-V virtual partition or entire disk becomes full after running the vm for a period of time. If there's free space in a disk, you can resize virtual partitions in this disk. If entire disk is full, you can resize virtual disk with Hyper-V native tools. This article introduces detailed steps to resize disk and partition for Hyper-V virtual machine without losing data.
How to change partition size (resize virtual partition) in Hyper-V vm
In most of virtual machines that running Windows 10/8/7 or Windows Servers, there are several partitions in a virtual disk. If one of them is getting full, you can shrink other one that has plenty of free space. Then you'll get unallocated space that can be added into the full partition. During this process, Operating System, programs and data in the virtual machine keep the same with before, except partition size changed.
It is easy to resize partition in hyper-v vm, but there are two things you should do before starting:
- Create Checkpoints or independent backup.
- Run safe disk partition software.
The same with physical computer, there's potential system damage and data loss risk while resizing virtual partition in Hyper-V vm. You should take care of data especially when resizing partition in a virtual server. Better than other software, NIUBI Partition Editor has innovative Virtual Mode, Cancel-at-will, 1-Second Rollback and Hot Clone technologies to protect system and data. Thanks to its unique file-moving algorithm, it is also 30 - 300% faster.
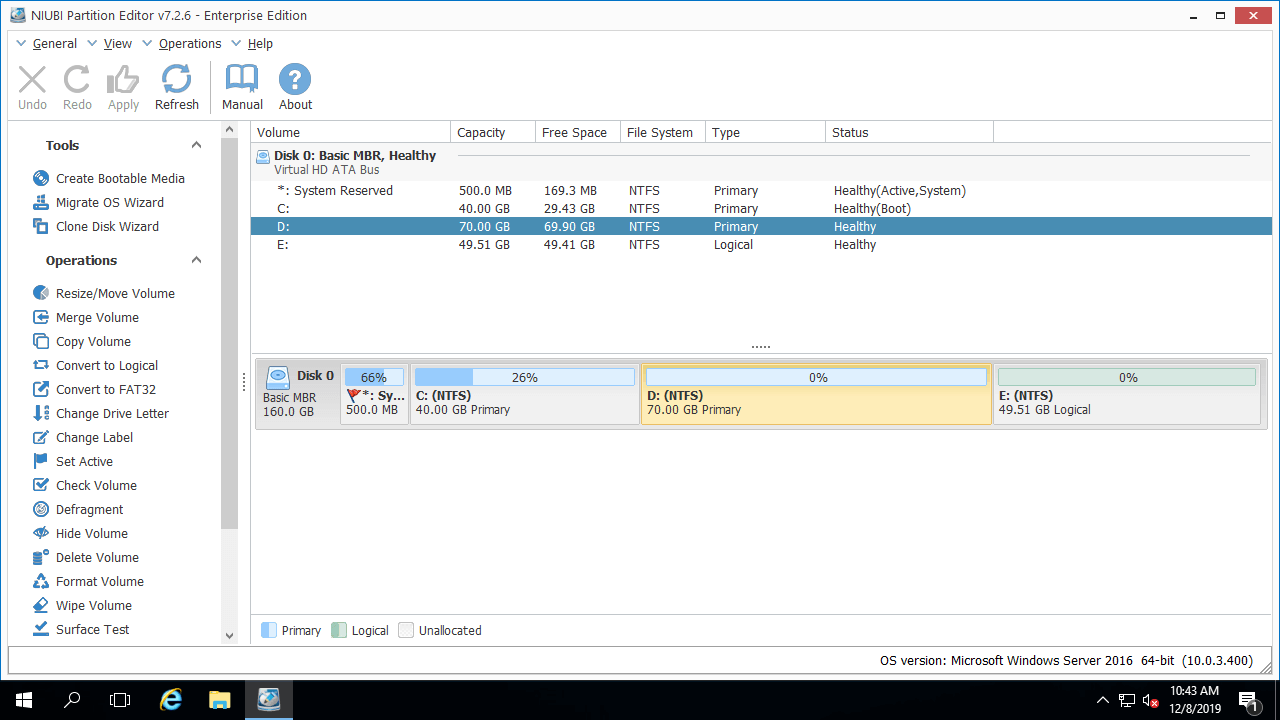
Download and install NIUBI Partition Editor in Hyper-V vm, you'll see all virtual disk with partition structure on the right, available operations to selected disk or partition are listed on the left and by right clicking.
When everything is ready, we can begin to resize partition for Hyper-V virtual machine. If you want to shrink a larger partition to create new, simply right click it and select "Resize/Move Volume". Drag either border towards the other one in the pop-up window, then part of free unused space will be converted to unallocated. Then right click this unallocated space and select "Create Volume".
If you want to resize partition D to expand C in Hyper-V virtual machine, follow the steps below:
- Right click the right contiguous drive D: and select "Resize/Move Volume", in the pop-up window, drag the left border towards right, or enter an amount in the box of "Unallocated space before". Then unallocated space is generated on the left side.
- Right click C: drive and select "Resize/Move Volume" again, drag right border to towards right to combine this adjacent unallocated space.
- Click "Apply" on top left to execute, done. If you changed your mind, simply click "Undo" to cancel the pending operation, partitions won't be resized until click "Apply" to confirm.
You may also resize the non adjacent drive E to get unallocated space, but in that case, there's an additional step to move unallocated space next to C drive before merging.
Watch the video how to resize virtual partition in Hyper-V vm:

In your virtual machine, the drive letters may be different, for example C, E and F in the same Disk 0. In that case, shrink drive E and make unallocated space on the left, and then merge it to C drive. Or shrink drive F and make unallocated space on the left, then move drive E towards right, finally merge unallocated space into C drive.
How to resize disk for Hyper-V virtual machine
Better than physical server and computer, you can resize hyper-v disk to smaller or larger without losing data. There are 2 native tools to help resize virtual disk in hyper-v virtual machine: PowerShell and Hyper-V Manager. With either tool, you should operate in physical computer.
- PowerShell is much easier but it requires deleting associated Checkpoints and shutting down the guest virtual machine. Learn how to expand vm disk for Hyper-V with PowerShell.
- It requires much more steps with Hyper-V Manager but you can resize virtual disk without shutting down guest virtual machine. Learn how to increase virtual disk size with Hyper-V Manager.
After expanding original virtual disk, additional space will be shown as unallocated at the end, then you create new volume with it or combine it to other partition to increase size.
In Summary
When there's available free unused space in a disk, there's no difference to resize physical partition in local computer or resize virtual partition in Hyper-V vm. If there's no available free space in a disk, you have to copy or restore to another larger disk for physical computer. But in hyper-v virtual machine, you can expand the virtual disks directly. Additional unallocated space can be extended to other virtual partition(s) easily.
As the safest and fastest disk partition software, besides shrinking, moving and extending partition, NIUBI Partition Editor helps do many other disk and partition management operations.