This article introduces how to free up disk space with Disk Cleanup in Windows 7 32/64 bit, and additional option to regain free space for system C drive.
No matter you use Windows 7 laptop or desktop, use Solid-State Drive (SSD) or traditional mechanical hard disk, you'll encounter the problem that system C drive running out of space. In this situation, Windows 7 has native Disk Cleanup utility to help you free up disk space.
1. About Windows 7 Disk Cleanup utility
Disk Cleanup is a Microsoft built-in utility that first integrated with Windows 98 and included in all subsequent Windows versions. It allows users to remove the junk files that are no longer needed and can be deleted safely. There are a number of different file categories that Disk Cleanup can analyze and clear up. Removing unnecessary junk files can help to speed up and improve the performance of the computer.
Windows 7 Disk Cleanup is enabled by default, the GUI and steps are similar with other Windows versions. Disk Cleanup in Windows Server 2012 and Server 2008 (R2) are not enabled, so you need to install by yourself.
2. How to start Disk Cleanup in Windows 7
There are 3 ways to launch Windows 7 Disk Cleanup utility.
Option 1:
- Click Windows icon on bottom left corner to open Start menu.
- Click on Programs > Accessories > System Tools > Disk Cleanup.
Option 2:
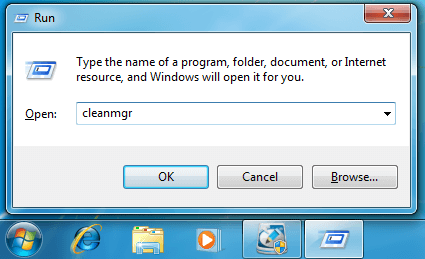
- Press Windows and R together on keyboard to open Run.
- Type cleanmgr and press Enter.
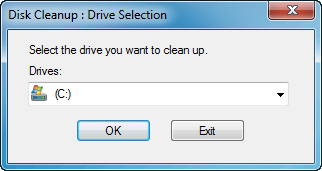
- Once Disk Cleanup opens, the initial window will ask you which drive you want to clean up. Select the appropriate drive and click OK.
Option 3:
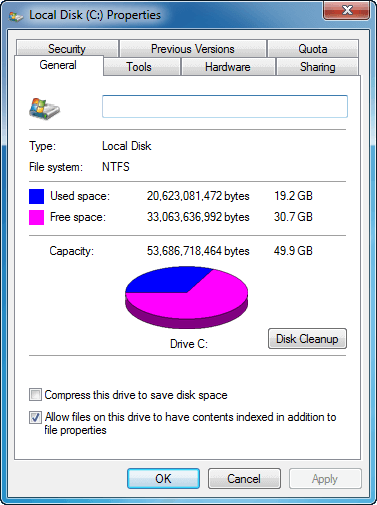
- Press Windows and E on keyboard to open File Explorer, right click C drive (or other drive) and click Properties.
- Click Disk Cleanup button in General tab.
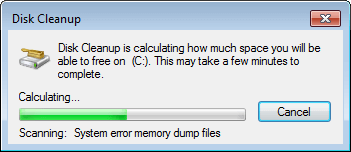
Disk Cleanup will calculate how much space you'll be able to clear up. This process can last for a few seconds to a few minutes. In general, the more cluttered your disk, the longer it will take to scan.
3. How to clean up disk space in Windows 7
It is very easy to free up disk space in Windows 7 with Disk Cleanup, follow the steps below:
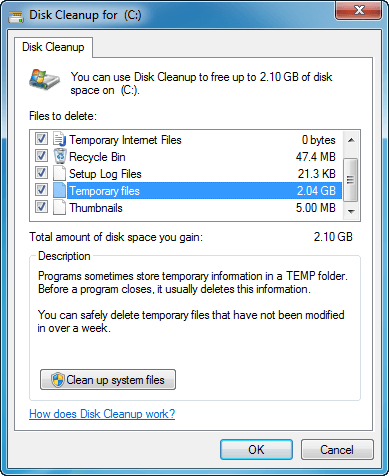
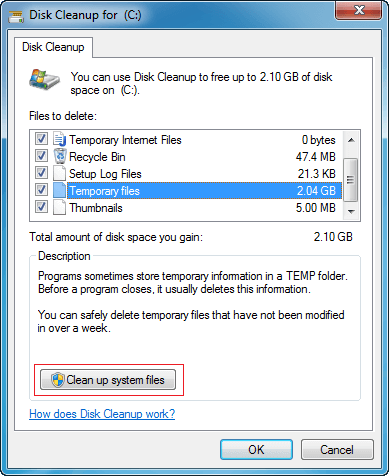
Step 1: Select the files you want to delete and click OK to proceed.
Highlight each option you can see which files this category includes, and what exactly you will be deleting. (Make sure that you've clicked the check-boxes for each of the files that you want to clear up.)
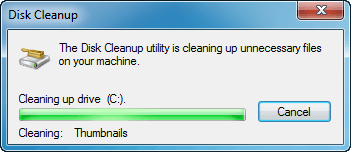
Step 2: Click Delete Files to confirm and begin deleting.
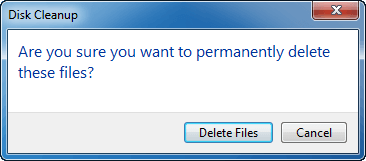
The time is depending on how much files you selected. This disk cleanup window will disappear when it complete.
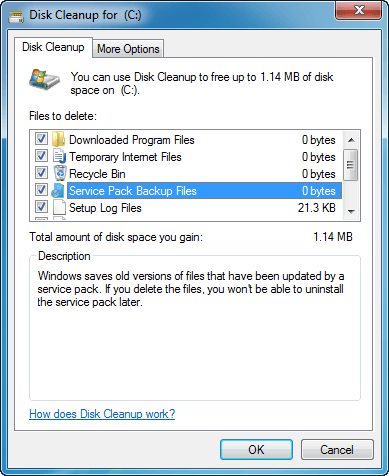
Step 3: Restart Disk Cleanup, click Clean up system files to repeat.
Step 4: Select files and click OK. Some different types of files can be selected.
4. Additional option to clean up C drive
If your system partition C is almost full, you'd better regain more free space as fast as possible. If you did not get enough free space via Disk Cleanup utility, continue the options below.
① Uninstall unused programs
Consider uninstalling the programs that you no longer or seldom use, the more program uninstalled, the more disk space will be released.
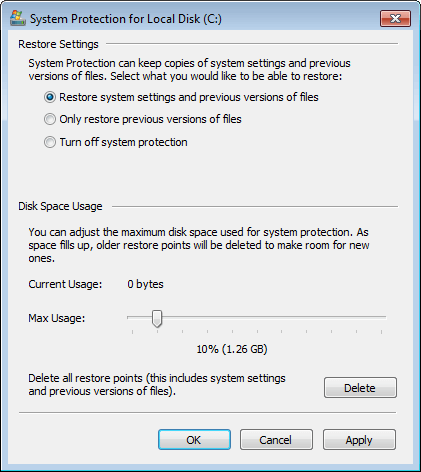
② Decrease disk space usage for System Restore
Windows 7 keeps backups of lots of system files every time something major such as driver installation and software installations happens, and after a while this can take up lots of space. You may completely turn it off to release all disk space or decrease the space usage for System Restore.
To open Windows 7 System Restore:
Click Windows > Control Panel > System > System protection
To turn off or decrease disk space usage:
Click Configure in System Protection tab, there are 3 options and select one, you can adjust the maximum disk space usage or system protection by dragging on Max Usage bar.
Turning off system protection won't delete all restore points automatically, to do this, you should click the Delete button on the bottom.
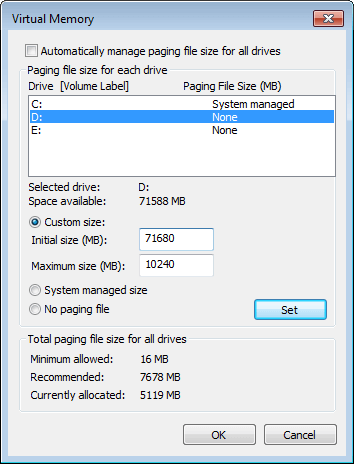
③ Move paging file
Page file is used by Windows as RAM and it's located in C drive by default, you can decrease it or set it to other volume.
To do this:
- Press Windows and R together on keyboard to start Run.
- Type sysdm.cpl ,3 and press Enter.
- Click Settings under Performance in Advanced tab.
- Click Change under Virtual Memory.
- Uncheck Automatically manage paging file size for all drives on the top.
- Select D: or other drive, enter amount of Initial size and Maximum size in Customer size radio box, and then click Set.
- Select C: drive and select No paging file radio box, then click Set.
- Click OK. (It may requires reboot to take affect)
④ Add more free space from other partition
With disk partition software, you can shrink other volumes and transfer free unused space to C drive without reinstalling Operating System or programs. Everything keeps the same with before after repartitioning hard drive.
Download NIUBI Partition Editor and follow the steps in the video:
As the safest Windows partition manager, NIUBI Partition Editor has unique 1 Second Rollback, Cancel-at-will and Virtual Mode technologies to protect system and data. There's free edition for Windows 10/8/7/Vista/XP home computer users.
You'd better run Windows 7 Disk Cleanup utility once a month to delete new generated junk files.