This article introduces how to extend C drive with Unallocated space in Windows 7 32/64 bit, shrink drive D to extend system partition without losing data.
Windows Updates and many other types of files write into C drive every day, so system C drive becomes full sooner or later. In that case, you can extend C drive without reinstalling Operating System and programs. A 256GB physical hard disk cannot be increased to 512GB, so before extending C drive you should get some usable Unallocated disk space. In Windows XP Disk Management, Unallocated space can only be used to create new partitions, but in Windows 7 Unallocated can be used to expand other drive with new Extend Volume function.
What is Unallocated space?
In a hard disk drive, the disk space that occupied by Operating System, File System and personal files are called Used space. Unused space of each partition is called Free space. As the name, Unallocated space is not allocated to any partition.
But in fact, it only indicates that this area has no File System and is writable, but there may be files that can be recovered. When you format/delete a partition or delete files, only the records of the files are removed, but the real data is remaining. To Operating System, it is much faster and easier by this way, otherwise, it is a heavy work especially when there are large amount of files.
How to get Unallocated space?
To get Unallocated space, you can accomplish in Windows 7 Disk Management without third party program, and there are two ways by deleting or shrinking other volume.
To delete a volume:
Press Windows and R together on the keyboard, type diskmgmt.msc and press Enter, right click this partition and select Delete Volume. After deleting this partition, all its disk space will be converted to Unallocated, all files in it will be deleted.
To shrink a volume:
Right click this partition in Disk Management and select Shrink Volume, enter an amount of space and click Shrink. After shrinking a partition, part of unused space will be converted to Unallocated, all files keep intact.
Can't extend C drive with Unallocated space in Windows 7
Although there is Shrink and Extend Volume built in Windows 7 Disk Management to resize partition without losing data, you'll encounter many trouble because both functions have restrictions. The typical example is that you can't extend a partition by shrinking any other one.
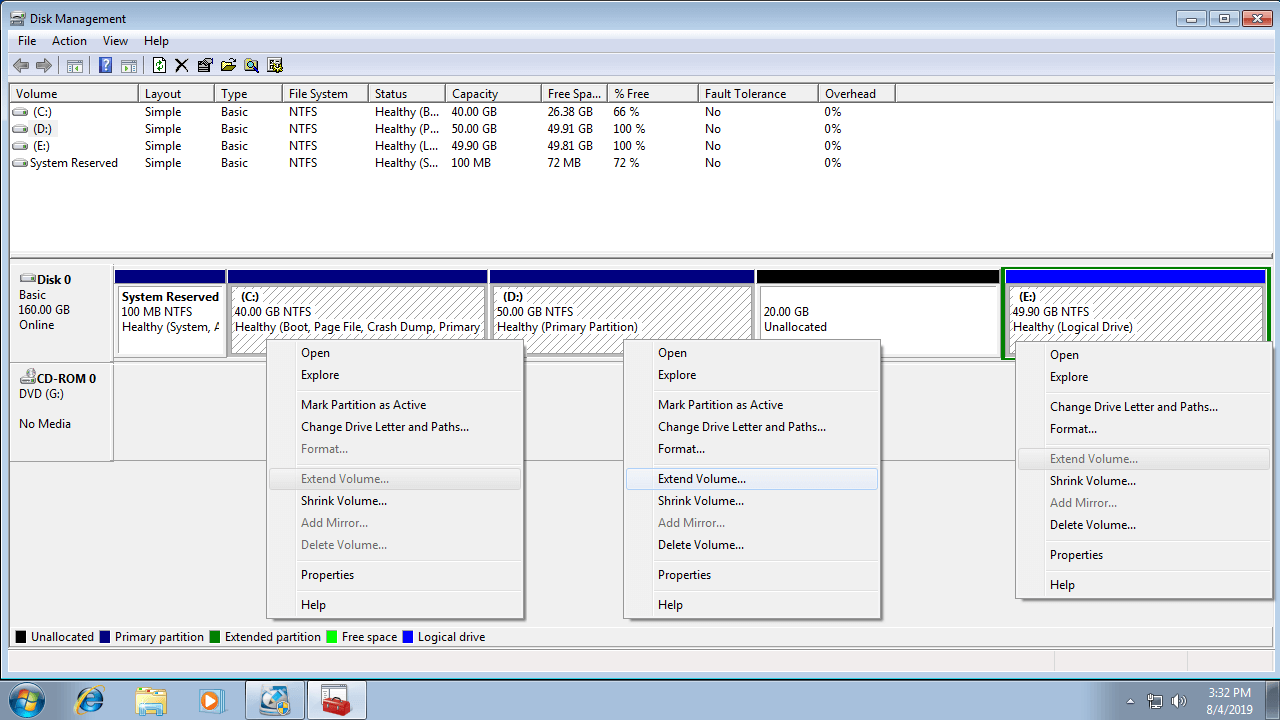
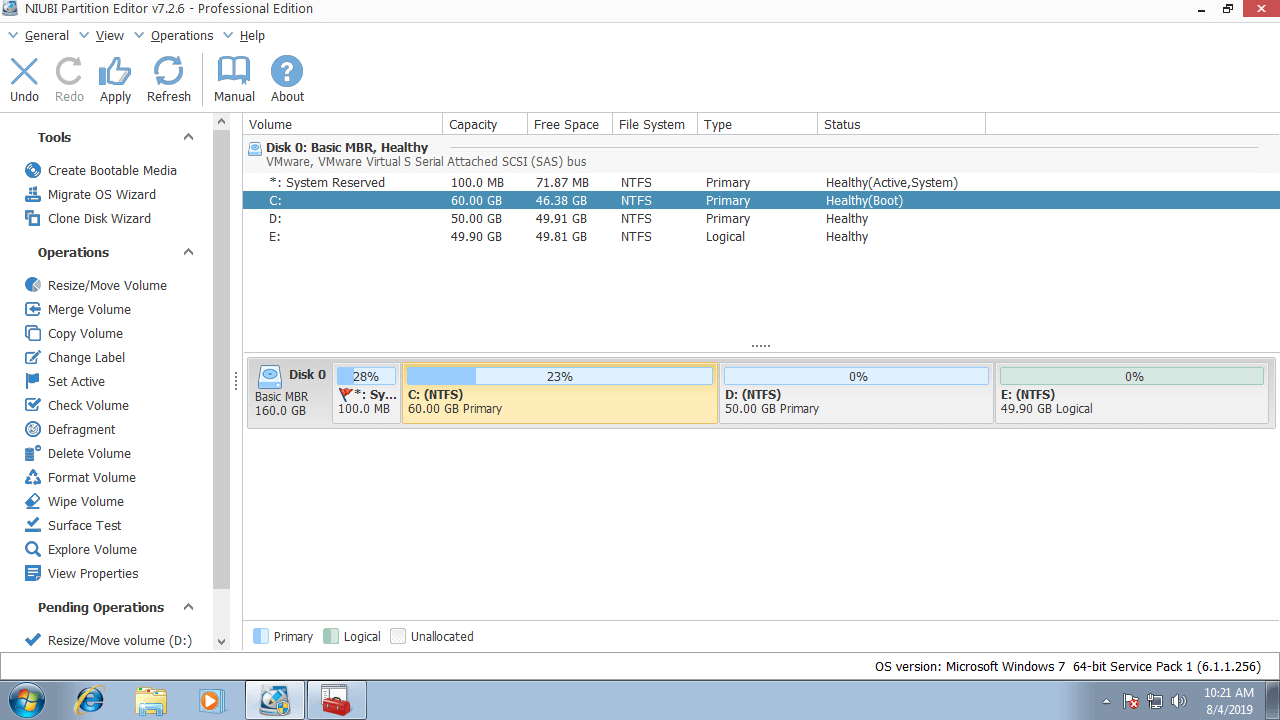
As the screen shot shows, Disk Management cannot extend volume C: and E: after shrinking D.
This is because:
- Shrink Volume function can only make Unallocated space on the right while shrinking any partition.
- Extend Volume function can only combine Unallocated space to the contiguous partition on the left.
Unallocated space shrunk from D drive is non adjacent to C drive and is on the left side of drive E, therefore, Extend Volume is disabled.
This is the most common issue encountered by Windows computer users.
Because Extend Volume doesn't work, some people try to delete drive D instead. If the right contiguous partition D is Primary, Extend Volume will be enabled after deleting it. If partition D is Logical, you still cannot extend C drive after deleting it.
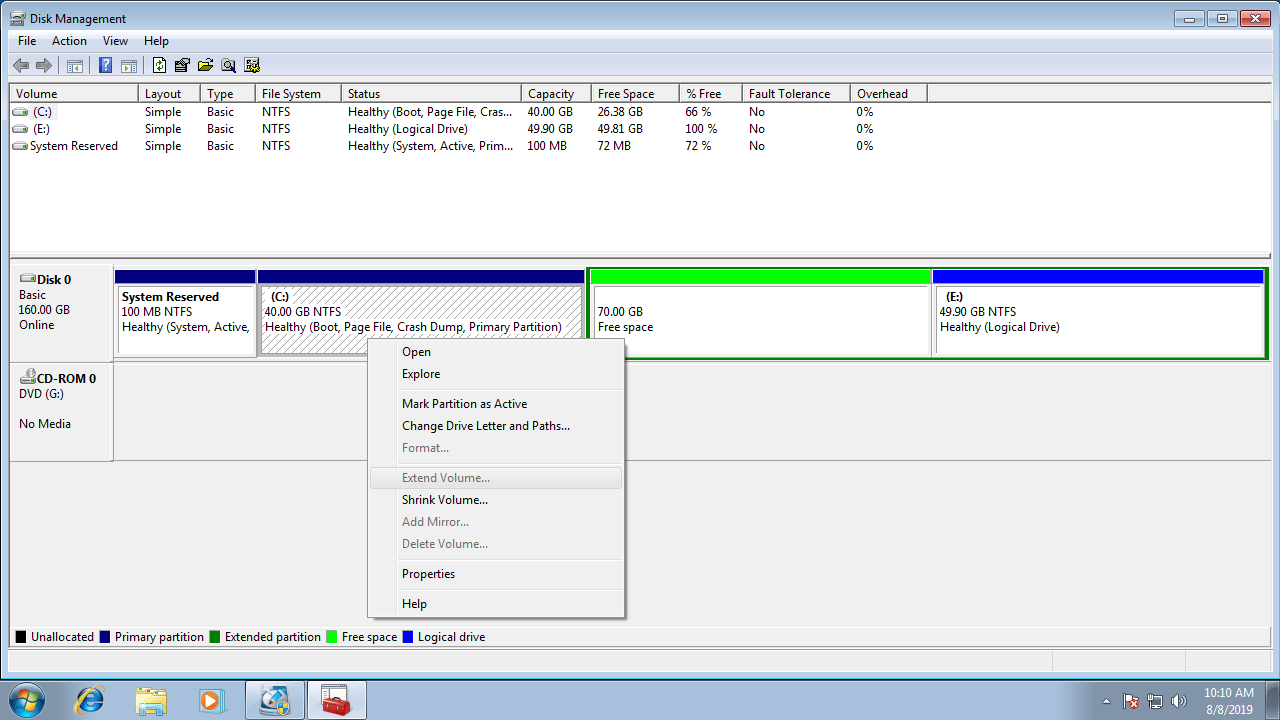
As the screen shot shows, Extend Volume is disabled for C drive after deleting the contiguous partition D.
Unlike Primary partition that works as independently, Logical drives are part of the Extended partition, so disk space shows as Free instead of Unallocated after deleting.
In this situation, to enable Extend Volume for C drive partition, you must delete all other Logical drives and then delete the entire Extended partition. Obviously, it's a bad way.
How to extend system partition C in Disk Management
Most of C: drive are formatted as NTFS and Primary, so to extend C drive in Windows 7 Disk Management, the only way is by deleting the adjacent drive D. In addition, drive D must be also Primary partition. If your disk partition configuration meets these requirements, you can extend C drive by following the steps below easily.
- Back up or transfer all files in drive D to other partition.
- Open Disk Management and delete drive D.
- Right click C drive and select Extend Volume to combine the contiguous Unallocated space.
If you installed programs in drive D, do NOT delete it.
Best way to increase C drive space with Unallocated space
If you have shrunk drive D and got Unallocated space, you have to run NIUBI Partition Editor to move Unallocated space from right of D to the left, then system C drive can be extended easily.
Steps to extend C drive with Unallocated space in Windows 7 32/64 bit:
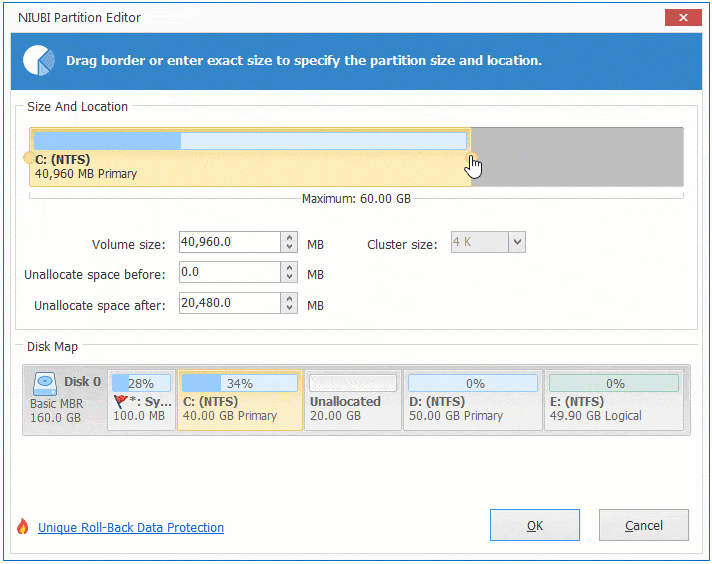
Step 1: right click drive D: and select "Resize/Move Volume", drag middle towards right in the pop-up window.

Then Unallocated space is moved next to C drive.

Step 2: right click C: drive and select "Resize/Move Volume" again, drag right border towards right to combine Unallocated space.
Then system partition C is extended with this Unallocated space.
Step 3: click Apply on top left to execute. (All operations before this step only work in virtual mode.)
- If you have not shrunk with Disk Management, you can shrink with NIUBI and make Unallocated space on the left, so you can extend C drive without moving Unallocated space.
- If there is not plenty of free unused space in the right contiguous partition, you can shrink any other one on the same disk.
- If there is no available free space in the disk, you can copy to a larger one with extend C drive with additional disks space.
Watch the video how to extend system partition C with Unallocated space in Windows 7:
In Summary
Windows 7 provides Shrink and Extend Volume functions to change partition size, but it only works by deleting the right contiguous Primary partition. NIUBI Partition Editor can shrink other partitions to extend C drive by merging contiguous Unallocated space, or move nonadjacent Unallocated space next to C drive and then combine. It also helps you do many other disk partition management operations.