This article introduces why Extend Volume greyed out in Windows 7 32/64 bit and the solution when Extend Volume option is disabled for system C drive or other partitions.
C drive full and low disk space is most common issue on Windows 7 computer, no matter you use laptop or desktop, use SSD or traditional mechanical hard disk for operating system. Nobody likes to recreate disk partitions, reinstall Windows and all programs. So Microsoft added Shrink Volume and Extend Volume functions in Disk Management to help resize partition without losing data.
However, both functions have limitations when repartition hard drive. Search by Google and you'll find that many people have the same issue: Extend Volume is disabled for C drive after shrinking D. In this article, I'll introduce all possible reasons and how to fix Windows 7 Extend Volume greyed out issue.
Reasons why Windows 7 Extend Volume is grayed out
There are 4 common reasons why Extend Volume greyed out in Windows 7 Disk Management, I'll introduce one by one. Press Windows and R together on the keyboard, input diskmgmt.msc and press Enter to open Disk Management, find out the corresponding reason according to your own disk partition structure.
Reason 1. No adjacent Unallocated space
A 300GB hard disk cannot be increased to 500GB (except VMware/Hyper-V virtual disk), so before extending a drive you should get some Unallocated space. As the name, this space is not allocated to any drive. In Windows XP Disk Management, Unallocated space can only be used to create new drives. In Windows 7, it can be added to other drive to increase partition size.
To get Unallocated space, you may either delete or shrink a drive. After deleting a volume, all its disk space will be converted to Unallocated but you'll lose all files in it. By shrinking a volume, only part of free unused space will be converted to Unallocated but you won't lose files.
Obviously, it's better to shrink a partition to get Unallocated space. The problem is, you can't extend a volume after shrinking other one with Disk Management. As the screen shot shows, Extend Volume is disabled for both C: and E: drive after shrinking D.
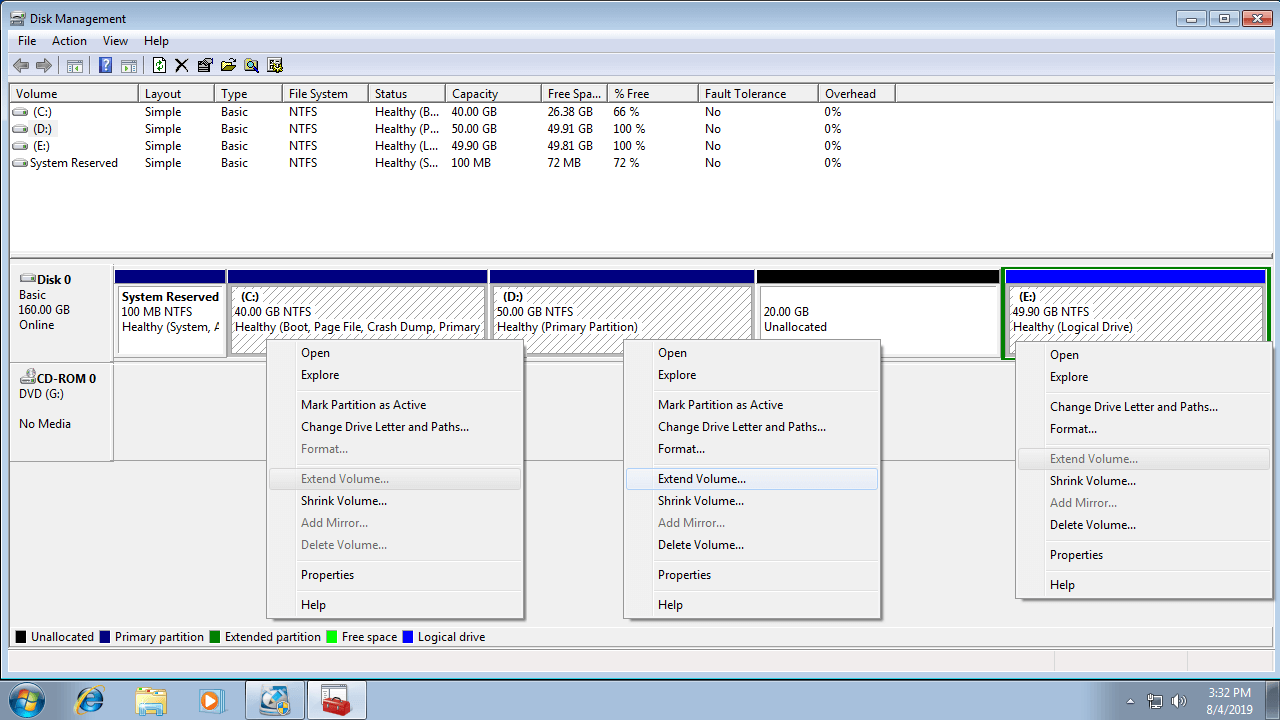
This is because:
- Shrink Volume function can only make Unallocated space on the right while shrinking any partition.
- Extend Volume function can only combine Unallocated space to the contiguous partition on the left.
This is the most common issue encountered by Windows computer users.
To extend C: drive partition, you should run third-party software to move Unallocated space from right of D drive to the left. To merge Unallocated space to the right contiguous partition (E:), 3rd-party software is needed, too.
Reason 2. Only NTFS is supported
Another annoying restriction of Extend Volume is that only NTFS partition is supported. You cannot extend FAT32 or any other types of partition even if there is adjacent Unallocated space on the right side.
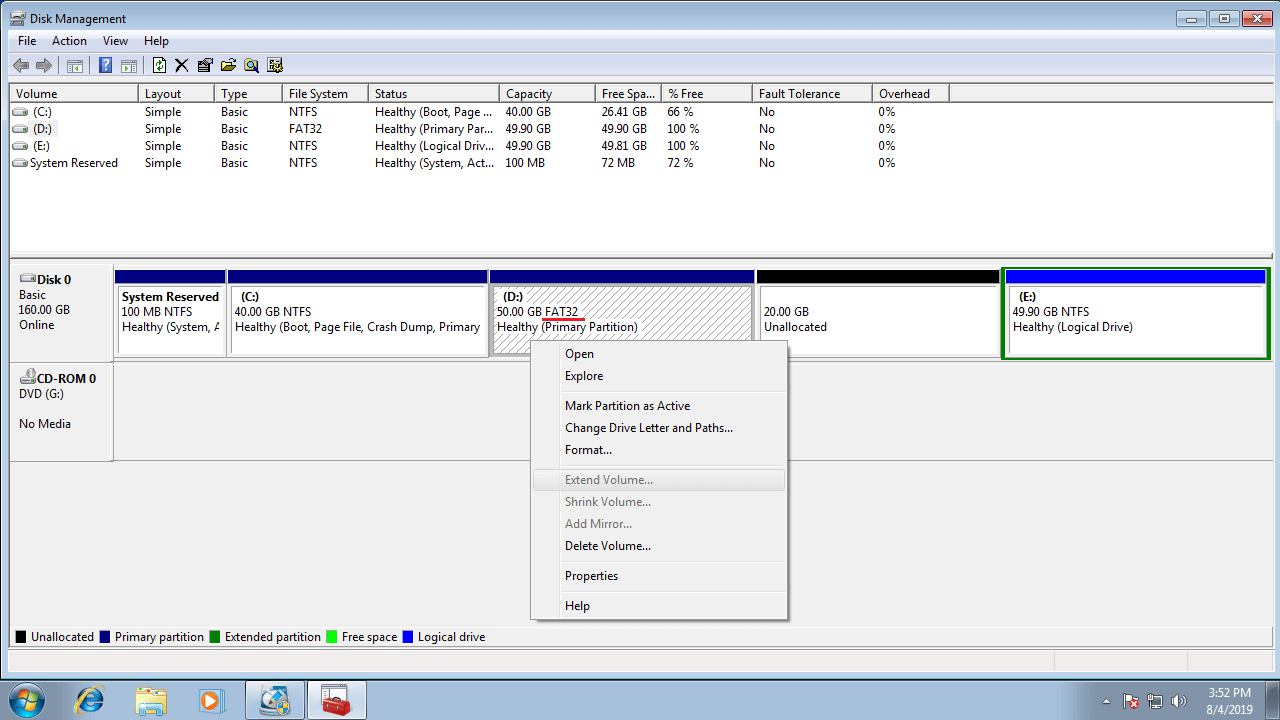
However, most of system C drive is formatted with NTFS, so this issue is common for data drives.
In this situation, you also need NIUBI Partition Editor, which has no difference resizing NTFS and FAT32 partitions.
Reason 3. Restriction between Primary and Logical partition
In MBR style hard disk, Free space deleted from a Logical partition can't be extended to any Primary partition. Unallocated space shrink from Primary partition can't be extended to any Logical drives.
As I said above, Unallocated space shrunk from D drive is non adjacent to C drive, so Extend Volume greyed out.
Some people tried to delete a partition to get adjacent Unallocated space. It works when you extend a Primary partition by deleting the adjacent Primary partition, or extend a Logical partition by deleting the adjacent Logical drive. But you cannot extend a Primary partition by deleting a Logical partition, or extend a Logical drive by deleting a Primary partition.
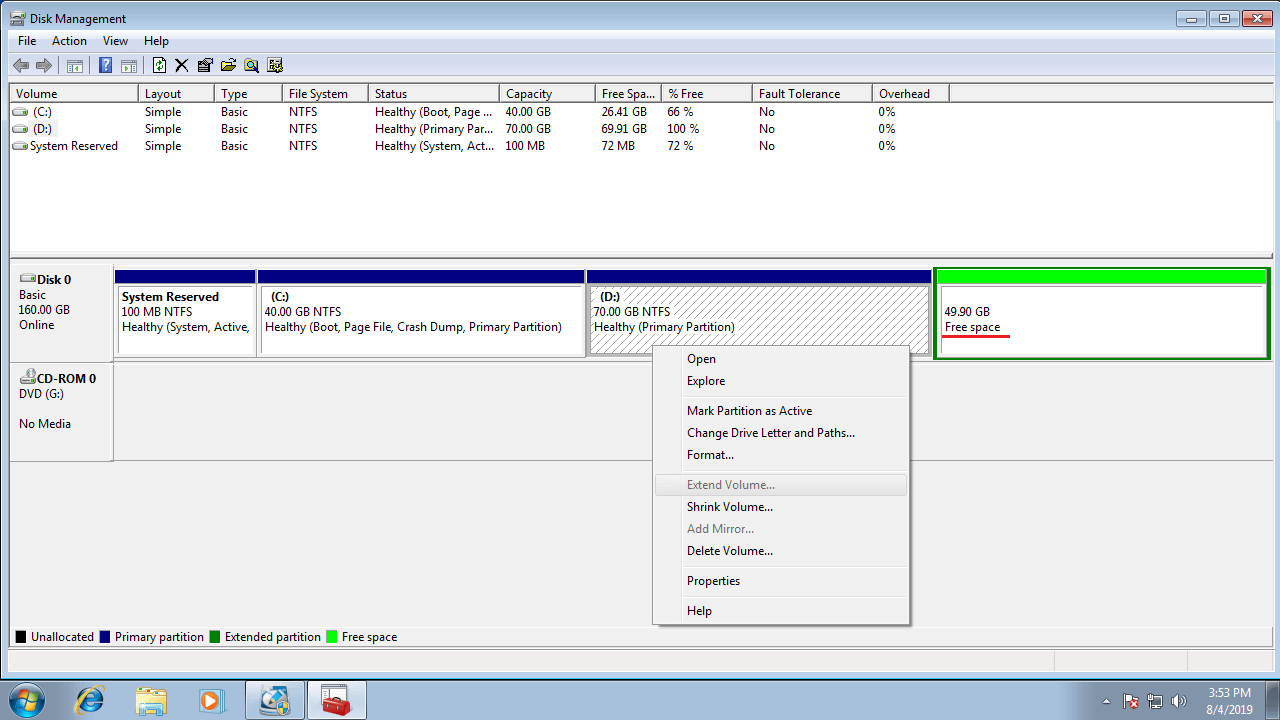
As the screen shot shows, Extend Volume greyed out for D drive after deleting the right contiguous partition E.
To convert the Free space to Unallocated, you must delete all Logical drives and the Extended partition.
In MBR disk there are only 4 entries in Master Boot Record, so you can only create 4 Primary partitions or 3 Primary plus an Extended partition. Unlike Primary partition that works as independently, Logical drives are part of the Extended partition, this is the reason why it shows as Free after deleting.
To NIUBI partition Editor, there is also no difference resizing Primary and Logical partitions.
Reason 4. Limitation of MBR disk
Nowadays, hard disks are much larger and it is very common to use 2TB to 4TB disk for personal computers. But if you initialized the large disk as MBR, you'll encounter another problem that you can only use 2TB disk space.
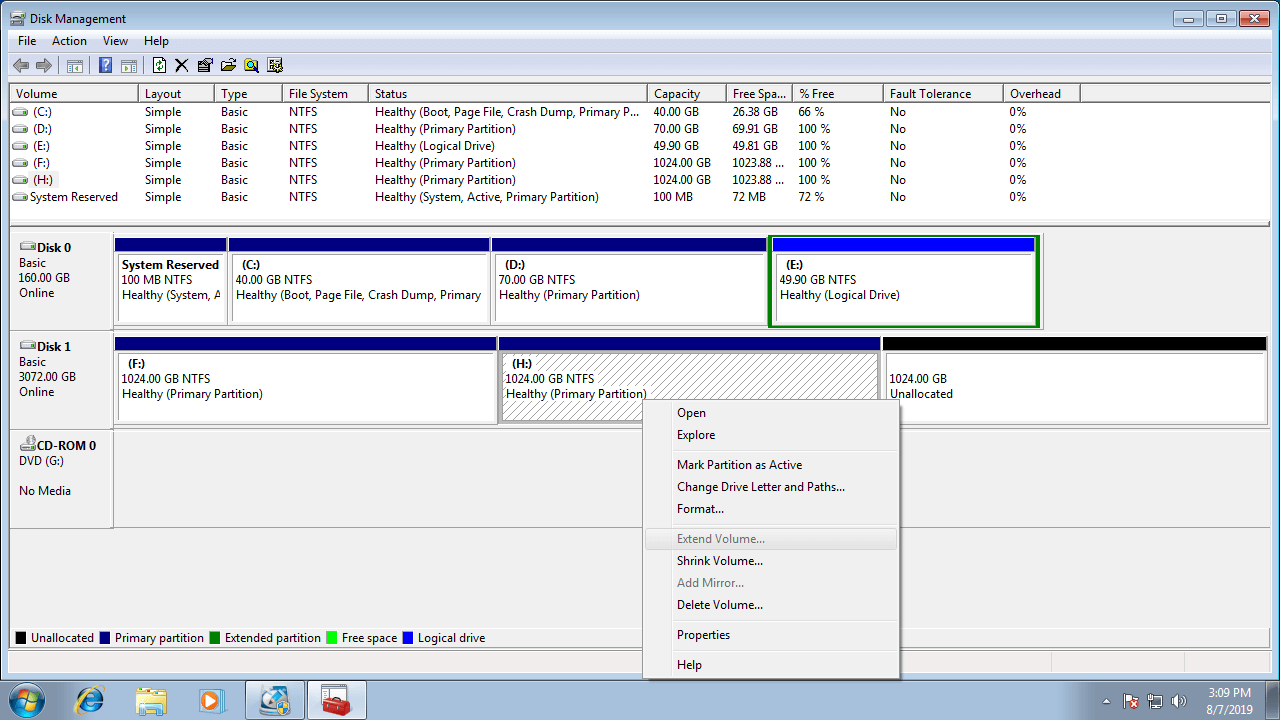
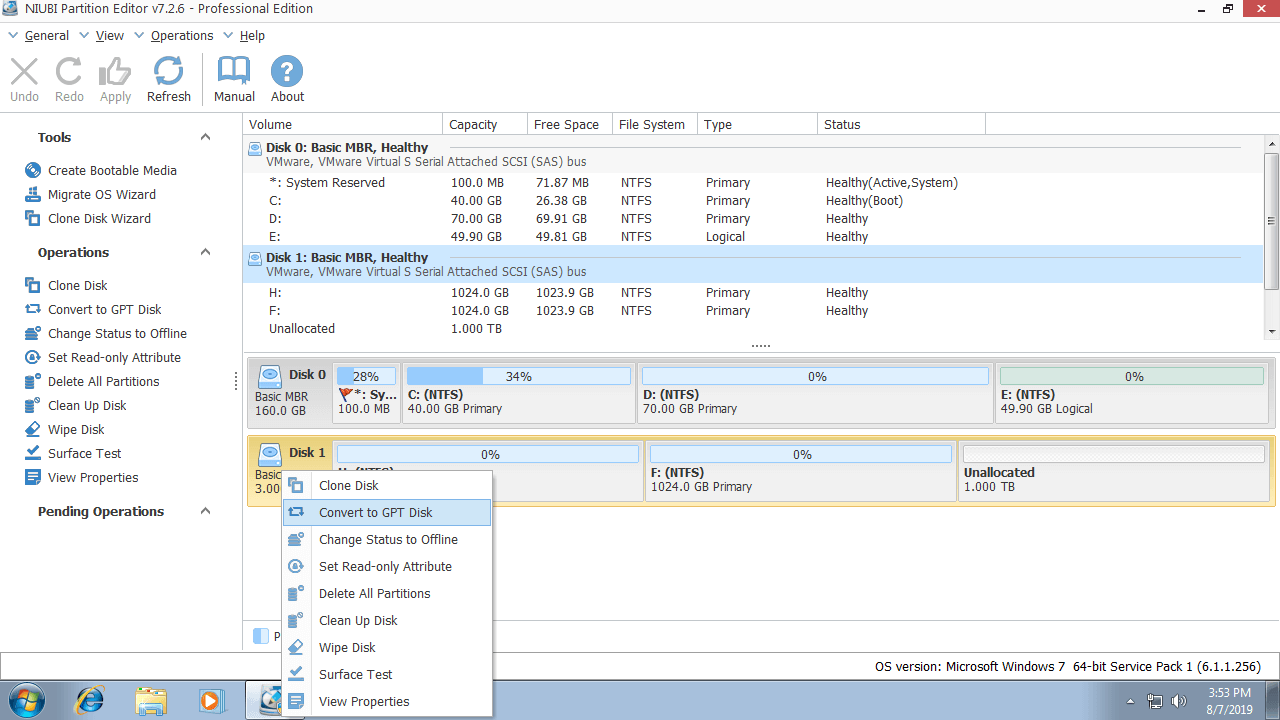
As the screen shot shows, drive H is formatted as NTFS and there is right contiguous Unallocated space, but Extend Volume is still grayed out. If you right click this Unallocated space in Disk Management, all options are unavailable.
In this situation, you need to extend partition with NIUBI Partition Editor (cluster size is equal or larger than 4KB) or convert disk from MBR to GPT and then extend partition with Unallocated space.
Solution when Extend Volume is disabled in Windows 7
It seems to be a bit complicated but it is very easy to solve this problem. Firstly, you need to Download NIUBI Partition Editor and then follow the corresponding method according to the reason why Extend Volume greyed out in your Windows 7 computer.
1. When Unallocated space is nonadjacent
If you have shrank drive D to get Unallocated space but Extend Volume is disabled for C drive, move Unallocated space to the left side, and then add it into C drive.
Steps to fix Windows 7 Extend Volume greyed out issue:
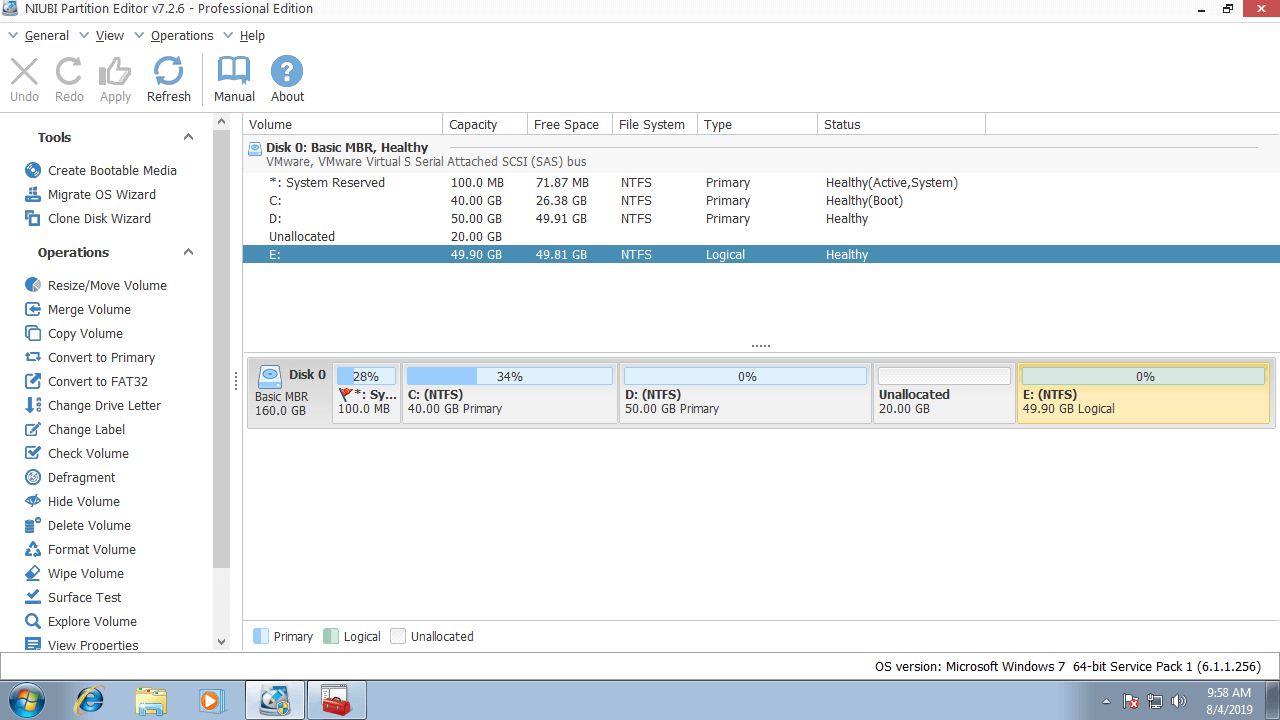
Step 1: right click drive D: and select "Resize/Move Volume", drag middle towards right in the pop-up window.

Then Unallocated space is moved next to C drive.

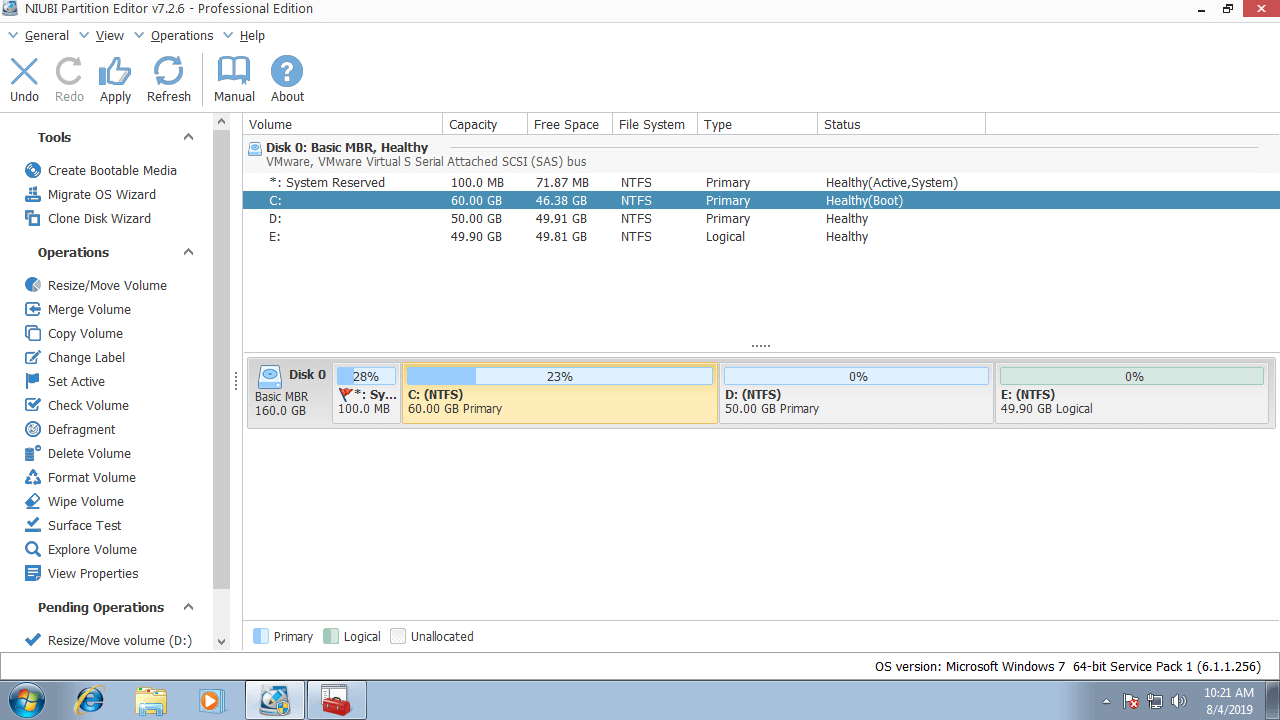
Step 2: right click C: drive and select "Resize/Move Volume" again, drag right border towards right in the pop-up window.
Then Unallocated space is added to system C drive.
Step 3: click Apply on top left to execute. (All operations before this step only work in virtual mode.)
2. About FAT32 and Logical/Primary partition
When the Unallocated/Free space is adjacent but Extend Volume greyed out because of not supported FAT32 partition, or the restriction between Logical and Primary partition. Simply follow STEP 2 to combine the adjacent space.
If you want to combine Unallocated space to the right contiguous partition E, right click E and select "Resize/Move Volume", drag left border towards left in the pop-up window.

3. When your disk is larger than 2TB
Right click front of this disk and select "Convert to GPT Disk", after that, follow steps above to combine Unallocated space to the partition(s) that you want to extend.
Video guide to fix Windows 7 Extend Volume greyed out issue
In Summary
Because of the inherent limitations of Disk Management, it is common to encounter the issue that Extend Volume greyed out in Windows 7/8/10 and other server versions. To solve this problem, find out the reason according to your own disk partition type and structure, and then follow the solutions above to resize partition, move Unallocated space or convert MBR disk to GPT with NIUBI Partition Editor.