This article introduces how to resize partition in Windows 7 32/64 bit without losing data. Resize Windows 7 volume with Disk Management and free partition editor.
To use disk space more efficiently you'd better create more than one volume especially when you have a large hard drive. Separate partition for system, programs and personal files. It is a good way to organize files and improve computer performance. However, there is still an issue of disk space usage especially to system C drive, which is very likely getting full. It cannot be better if you can resize Windows 7 partition without losing data, otherwise, you have to start from scratch to reinstall Windows and all programs.
In Windows 7, partition resizing become much easier than previous Windows XP, because Microsoft added new Shrink Volume and Extend Volume functions in Windows 7 native Disk Management tool. However, not all disk partitions can be resized due to some limitations, in that case, you need to run third party partitioning software.
How to resize partition in Windows 7 without software
Only when your disk partition configuration meets all requirements of Shrink and Extend Volume, you can change partition size in Windows 7 Disk Management without third party software. Firstly, let's see how to resize partition with Windows 7 Disk Management.
How to shrink a partition volume:
- Press Windows and R together on the keyboard, type diskmgmt.msc and press Enter to open Disk Management.
- Right click system C: drive or any data volume and select Shrink Volume.
- Enter the amount of space and click Shrink to execute.
How to extend a partition volume:
- Open Disk Management
- Right click the drive that has adjacent Unallocated space and select Extend Volume.
- Extend Volume Wizard will be opened, simply click Next to finish.
Limitations to resize volume with Disk Management
First of all, you should know that both Shrink or Extend Volume functions support NTFS partition only, another common FAT32 and any other types of partitions can't be shrunk or extended. Other limitations include:
When shrinking a partition volume:
- Unallocated space can only be made on the right, this space can't be extended to other partition without third party software.
- You cannot shrink volume beyond the point where any unmovable files are located, that means you can only shrink little space.
When extending a partition volume:
- Extend Volume only works when there is adjacent Unallocated space on the right side.
- Free space deleted from Logical partition cannot be extended to Primary partition, Unallocated space can't be extended to any Logical drive.
To resize Windows 7 partition, 3rd-party partitioning software is better choice. There is free partition software for Windows 7/8/10 home computer users.
Resize Windows 7 partition with free partition editor
Comparing with Windows Disk Management, partition software has no such limitations, and you can resize disk partition by simply dragging and dropping. However, there is potential risk of system damage and data loss.
Different with read-only programs, to resize volume in Windows 7 (and other versions), partitioning software will modify all parameters of associated disk, partition and files. In some situations, all files in the partition will be moved to new locations.
If some software internal error or hardware issue (such as power outage) occur during partition resizing, part of the parameters can't be modified or files can't be moved successfully. In that case, you cannot boot Windows or lose files of associated partitions. So you'd better back up first and select reliable software to resize partition.
As the safest partition tool in the market, NIUBI Partition Editor has innovative technologies to protect system and data.
① Virtual mode
Unlike Disk Management that take effect the modification instantly, NIUBI Partition Editor works in its virtual mode before confirmation. Operations you do will be listed as pending on bottom left for preview, you can undo the unwanted operations. Real disk partition won't be changed until you click Apply to confirm.
② 1-Second Rollback
If any software or hardware issue occur while resizing partition, this unique technology helps revert the computer to original status automatically and in a flash. If it happens, nothing will be changed or lost.
③ Cancel-at-will
If you applied incorrect operations, there's no option to cancel them with other software. But with the help of unique Cancel-at-will technology of NIUBI, you can cancel the ongoing operations without damaging data.
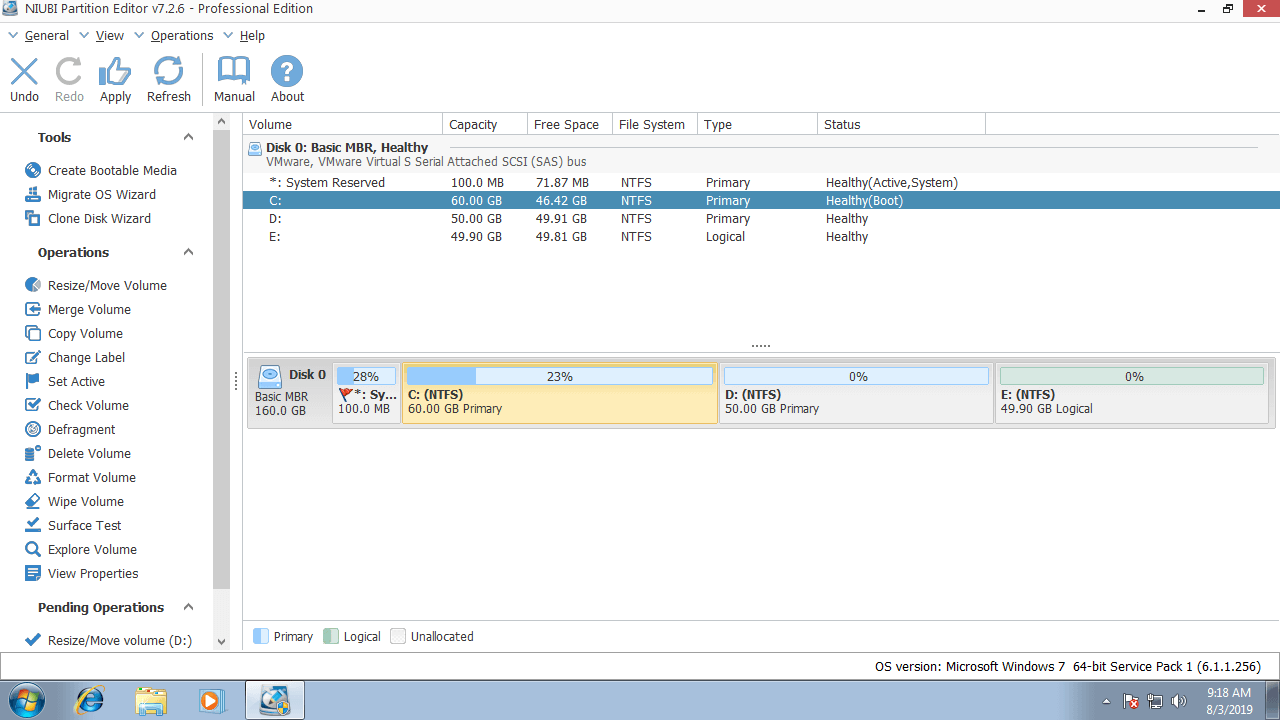
Download NIUBI Partition Editor, you'll see the main window with disk partition structure and other information.
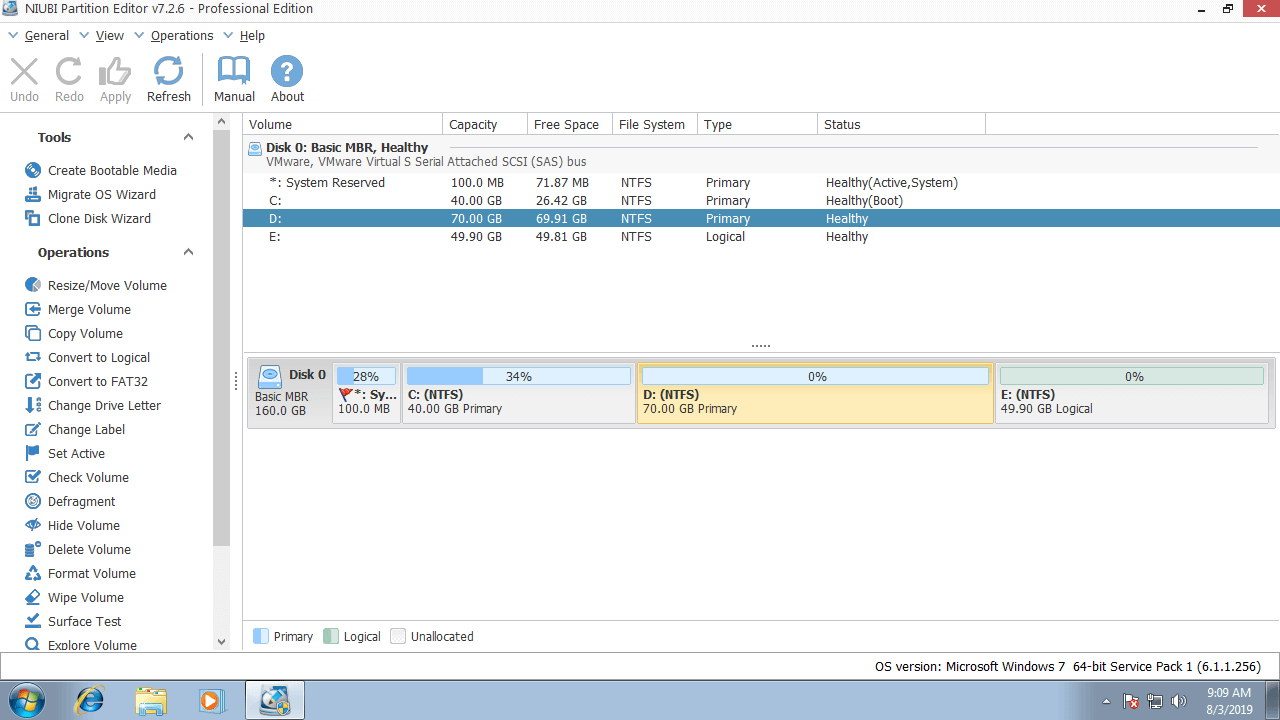
How to resize partition in Windows 7 (32/64 bit) with NIUBI:
Step 1: right click drive D and select "Resize/Move Volume", drag left border towards right in the pop-up window.
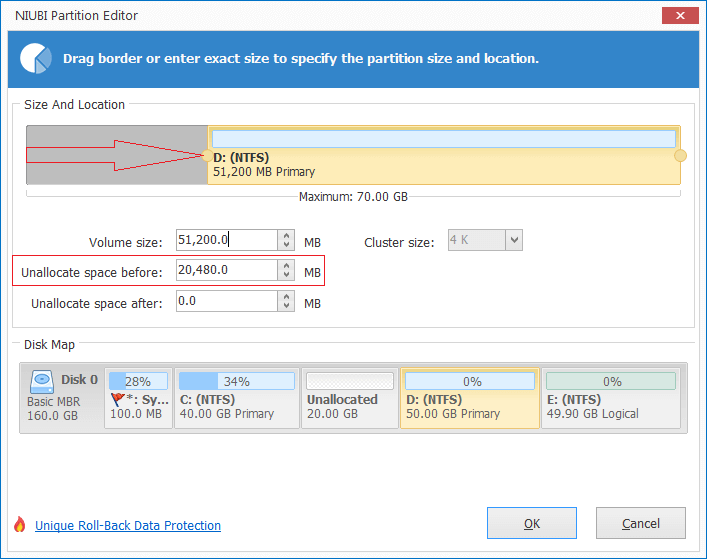
Then Unallocated space is made on the left side of drive D.
If you drag right border towards left or enter an amount in the box of Unallocated space after, then Unallocated space will be made on the right of drive D.
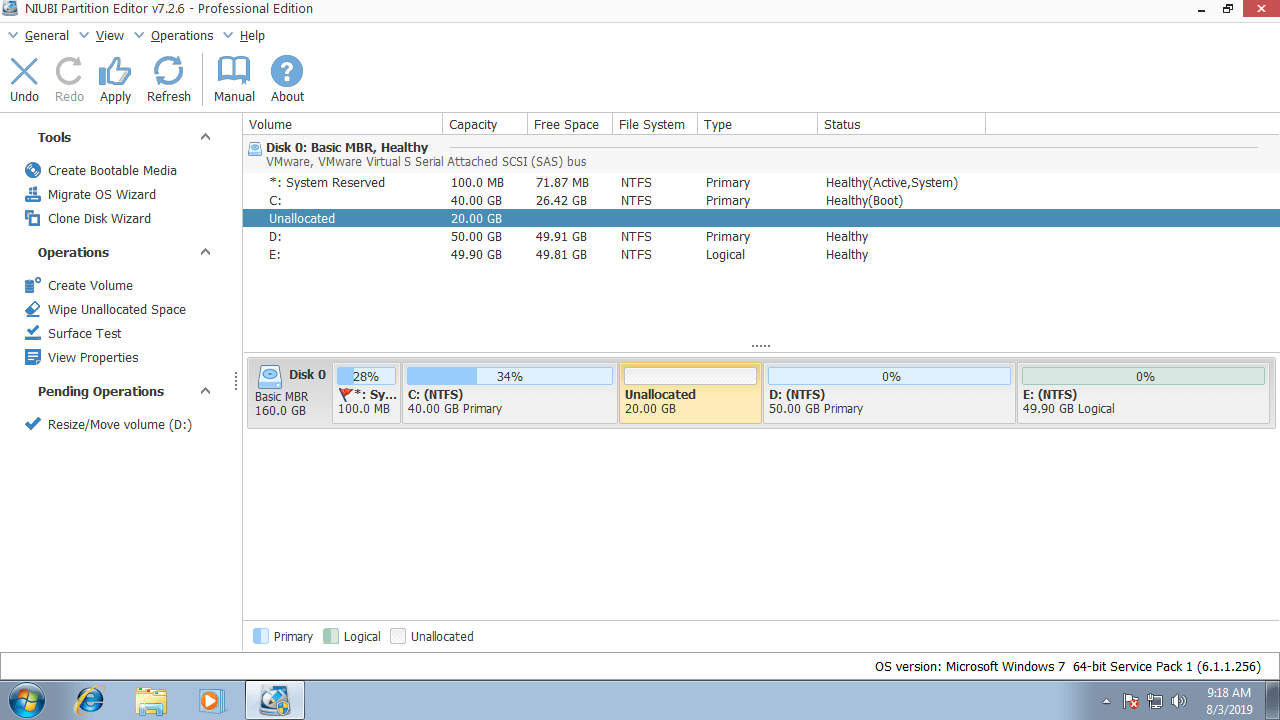
Step 2: right click drive C and select "Resize/Move Volume", drag right border towards right in the pop-up window to combine the Unallocated space.
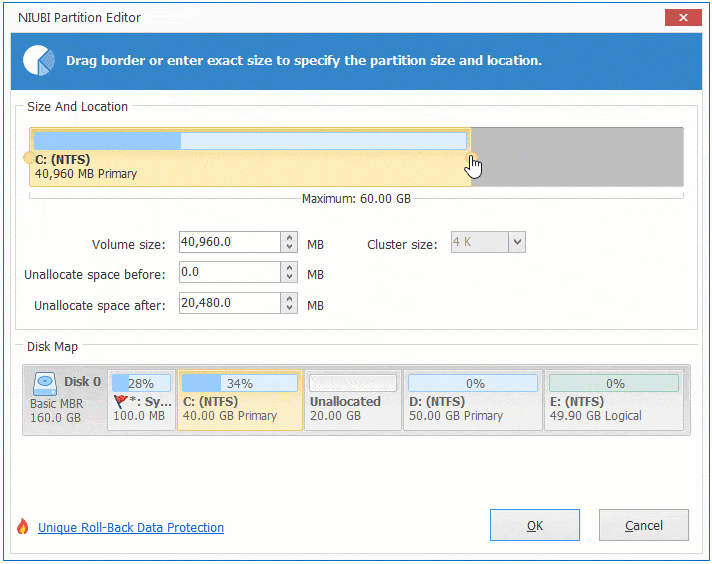
Then the system partition C is resized from 40GB to 60GB.
Step 3: click Apply on top left to execute.
If you want to resize the nonadjacent drive E to expand system partition C, there's an additional step to move partition D before merging Unallocated space to C drive.
Watch the video how to resize partition volume in Windows 7:
No software can extend a partition by adding space from other separate disk, so the partitions that you want to shrink and extend should be on the same disk, no matter this disk is physical or VMware/Hyper-V virtual.
If there is plenty of free space in any partition on a disk, simply follow steps above, no matter you want to resize physical disk partition, hardware RAID arrays or VMware/Hyper-V virtual disk volume. If there is not enough free space in a disk, you have two options depends on the device you are using:
- To physical disk, clone to another larger one with NIUBI Partition Editor.
- To VMware/Hyper-V virtual machines, follow the steps to increase virtual disk size of VMware and Hyper-V. After that, additional space will be shown as Unallocated on the end of original disk. Then follow the steps in the video above to combine Unallocated space to the partition(s) that you want to extend.
In Summary
Windows 7 built-in Disk Management has part of ability to change size of allocated partitions, but due to the inherent limitations, you still need professional partition software to help resize partition in Windows 7. Because of its powerful data protection ability and other advantages, NIUBI Partition Editor is the best choice to accomplish this task.