What will do you when system C: drive or other volumes are getting full? Waste several a long time to back up everything, recreate partitions and restore from backup? Nobody likes this. You can repartition hard drive in Windows Server 2008 R2 without losing data, of course with safe partition tool. This article introduces full solution to repartition hard drive in Server 2008/2012/2016/2019/2022, select the corresponding method according to your own disk partition configuration.
How to repartition hard drive without software
Windows Server 2008 and all subsequent versions have "Shrink Volume" and "Extend Volume" functions in Disk Management tool. This inbuilt tool is able to decrease and increase partition size without losing data. However, because of limitations of both new functions, Disk Management is not the best choice to repartition hard drive for Windows servers.
How to shrink allocated partition:
- Press Windows and R together on the keyboard, type diskmgmt.msc and press Enter to open Disk Management.
- Right click a NTFS partition and select "Shrink Volume". (FAT32 and other partitions are not supported)
- Enter the amount of space and click "Shrink" button.
How to extend partition:
- Right click a NTFS partition with contiguous unallocated space on the right, then select "Extend Volume" from the list.
- Simply click Next till Finish in the pop-up Extend Volume Wizard window.
Extend Volume option will be grayed out if this partition is FAT32 or there is no required unallocated space.
Server 2008 Disk Management can only help you shrink a NTFS partition to create new volume, or extend a NTFS partition by deleting the right adjacent volume. If you want to extend a partition by shrinking other one, Disk Management cannot help you. Learn why Extend Volume greyed out.
With server partition software, you can shrink any NTFS or FAT32 partition and make unallocated space on either left or right side. This space can be combined to either contiguous partition by 1 step, or move and merge to any non-adjacent partition on the same disk.
However, you should know that there's potential data loss risk while repartitioning hard drive with unreliable software, so remember to back up first.
Better than other tools, NIUBI Partition Editor provides innovative technologies to protect system and data such as:
- Virtual Mode - all operations will be listed as pending for preview, real disk partitions won't be modified until click "Apply" to confirm.
- Cancel-at-will - if you applied wrong operations, you can ancel the ongoing operations destroying partitions.
- 1 Second Rollback - if any error is detected while resizing partition, it automatically reverts server to original status in a flash.
- Hot Clone - clone disk partition without rebooting, you may clone system disk before any operations or regularly as backup.
How to repartition hard drive inside a disk
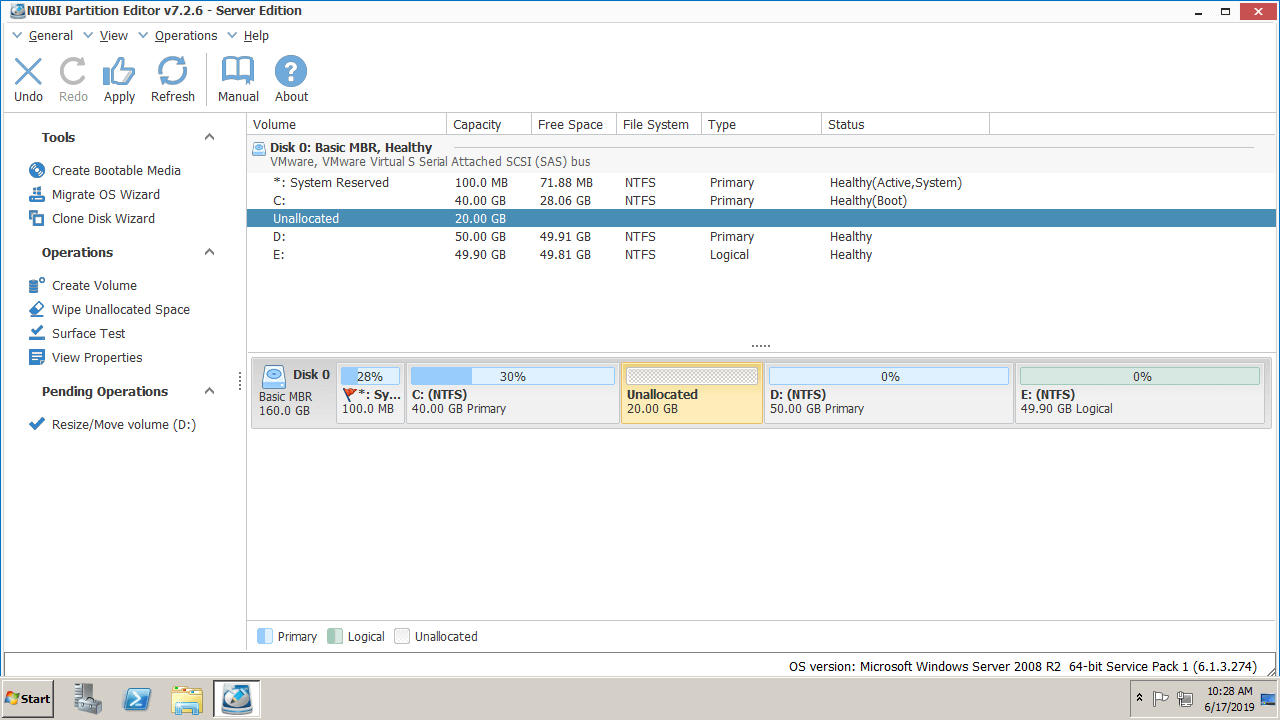
Download NIUBI Partition Editor, you'll see all disk partitions with structure and other information on the right, available operations to selected disk or partition are listed on the left or by right clicking. In my server, system partition C is in Disk 0 and original size is 40GB.

Check if there is plenty of free unused space in the right contiguous partition (D: or E:), if yes, follow the steps below to shrink it and extend C drive.
How to repartition drive in Windows Server 2008/2012/2016/2019/2022:
Step 1: Right click the right contiguous partition D: (or E:) and select "Resize/Move Volume", drag left border towards right in the pop-up window, or enter an amount in the box behind "Unallocated space before".

Then drive D is shrunk and unallocated space is made on the left.
Step 2: Right click C: drive and select "Resize/Move Volume" again, drag right border towards right to combine unallocated space.
Then the size of system C drive is increased to 60GB.
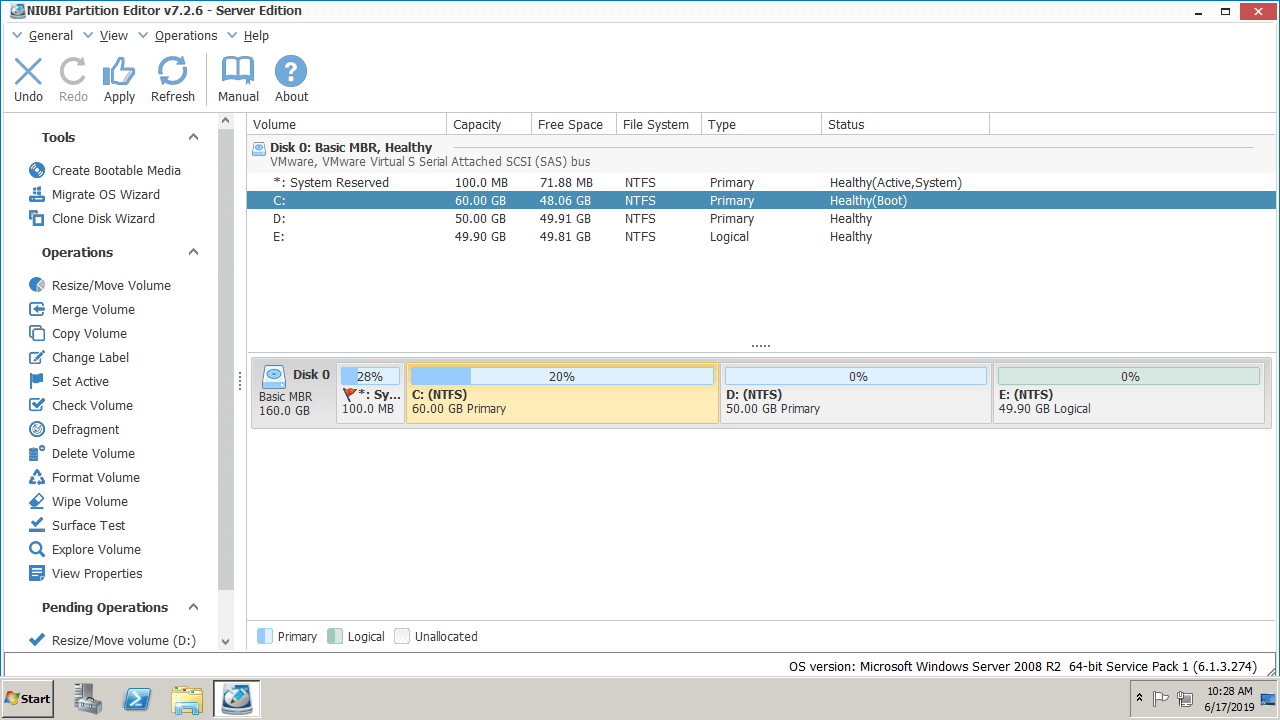
Step 3: Click "Apply" on top left to take effect.
Watch the video how to repartition hard drive in Windows Server 2008 R2:
Right click any NTFS or FAT32, Primary or Logical partition and then select "Resize/Move Volume", in the pop-up window:
- Drag the border towards the other one, then you can shrink this partition.
- Drag the middle towards other side, then you can move this partition and adjacent unallocated space.
- Drag the border opposite to the other one, then you can combine contiguous unallocated space to this partition.
How to repartition hard drive with other disk
No partitioning software can add free space from another separate disk. The separated disk means Disk 0, 1, 2, etc. that shown by NIUBI Partition Editor or Windows Disk Management, no matter this disk is physical or RAID virtual.
If there is free unused space in any partition, NIUBI can shrink it to extend other in the same disk. If there is no other partition or not enough free space in entire disk, NIUBI can copy this disk to a larger one and repartition hard drive with additional disk space.
Follow the steps in the video to repartition hard drive by copying to other disk:
How to repartition virtual hard drive of RAID, VMDK, VHD
If there is enough free space in any partition on the same disk, there is no difference to repartition RAID array or VMware/Hyper-V virtual disk.
When there is no available free space in original virtual disk, you can increase VMDK/VHD virtual disk size with the own tool of VMware or Hyper-V. Then you can repartition hard drive with additional unallocated space on the end of original virtual disk.
To any types of hardware RAID arrays, if the virtual disk is full, firstly check if your raid controller support RAID expansion. If yes, additional space will be shown as unallocated on the end of original virtual disk after rebuilding array with larger disks. If no, you need to copy original RAID virtual disk to to other physical disk or raid array.
No matter how your disk partition is configured, there's a way with NIUBI Partition Editor to repartition hard drive in Windows Server 2008 R2 and other versions.